
XP-FlightDeck › X-Plane 12 guides
X-Plane 12 Home Cockpit: Start With a Touch Panel
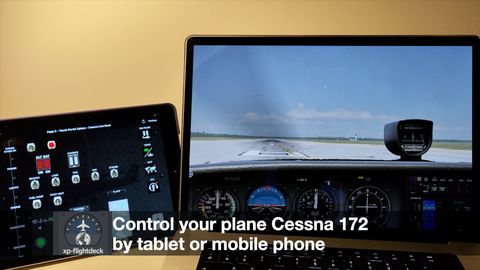
The easiest way to start an X-Plane 12 home cockpit is in three steps: good flight controls first (a yoke or joystick, plus rudder pedals if you can), then a panel for the switches you use on every flight, then dedicated hardware only for what you miss most. A tablet running a touch panel is a cheap and flexible way to cover the second step before you buy switch panels or button boxes.
This guide shows how to plan each step and how to lay out your first touch panel.
Step 1: flight controls
Flying with a mouse works, but a home cockpit starts with your hands on real controls. In X-Plane 12, plug in your yoke, joystick or pedals, then open Settings > Joystick & Equipment to calibrate the axes and assign buttons. To give a button a function, press and release it first, then pick the function; the Buttons: Adv tab lets you assign any X-Plane command (X-Plane Knowledge Base).
Keyboard shortcuts work the same way: in the Keyboard settings, each X-Plane command can be bound to a key (X-Plane 12 Desktop Manual). It is worth spending ten minutes here before buying anything else.
Step 2: a panel for the switches
Once the aircraft flies well, the next frustration is reaching for the mouse to flip a switch in the virtual cockpit: beacon, landing light, fuel pump, flaps, parking brake. That is what switch panels and button boxes solve, and a touch panel does the same job on a tablet.
Commands and datarefs, in one minute
Every switch panel relies on two X-Plane concepts. A command makes something happen, such as toggling the taxi light. A dataref holds a value, such as the current flap position. Laminar Research recommends using a command whenever one exists for the action, and datarefs to read the state of the sim (X-Plane Developer). A good panel sends commands and reads datarefs back, so its buttons always show what the cockpit really shows.
Why a tablet makes a good first panel
- No soldering, no wiring. The tablet talks to the computer over your local network.
- Room to grow. With Touch Portal Pro, one page can hold up to 110 buttons and you can add as many pages as you need (Touch Portal FAQ): one for the overhead, one for the engine, one for the autopilot.
- Easy to change. Moving a button is a drag and drop, not a new hole in a panel.
- Reuses what you own. An iPad, an Android tablet or a phone is enough to begin.
The trade-off is feel: glass has no physical travel, so you look at the panel when you press it. Many builders later move the switches they use most to physical hardware and keep the tablet for the rest.
Step 3: lay out your first touch panel
Pick one aircraft and build around its real flow. The X-Plane 12 manual points to the default Cessna 172 SP as a good aircraft to learn on, and the built-in Flight School tutorials use it for take-off and landing lessons (X-Plane 12 Desktop Manual). It is a sensible first target for a home cockpit too.
A simple layout that follows the order you use the switches:
| Row | What to put there |
|---|---|
| Top | Master and avionics, then the lights (beacon, nav, strobe, taxi, landing) |
| Middle | Engine start and fuel |
| Bottom | Flaps up and down, parking brake |
Keep the most used buttons large and at the edge of the screen, where your thumb finds them. Test the panel on a short pattern flight, then move what felt awkward.
Mounting the tablet
Place the tablet where your eyes already go: under the main screen, beside the yoke, or on your knee like a kneeboard. Keep it on charge for long flights and on the same network as the computer.
Step 4: add hardware where it matters
After a few flights you will know which actions you want under your fingers without looking: autopilot, trim, radios, gear. That is where dedicated hardware pays off. Keep the touch panel for everything else: it remains the cheapest way to have every switch of the aircraft within reach. Our comparison Stream Deck or tablet for X-Plane 12 helps with that choice.
Where XP-FlightDeck fits
XP-FlightDeck is a plug-in that links Touch Portal to X-Plane 12, so a tablet or phone becomes a panel for engine, lighting, brakes, flaps and more. It exposes X-Plane commands and datarefs to Touch Portal, comes with ready-made pages for common aircraft controls, and keeps tiles in sync with the cockpit in both directions, all on your local network (features). There is also a blue and white XP-FlightDeck livery for the default Cessna 172SP.
It runs on macOS 12 or later and Windows 10/11, needs Touch Portal Pro and X-Plane 12, and has a free version with the core actions; a license unlocks advanced features. XP-FlightDeck is not affiliated with Laminar Research or Touch Portal.
New to the tablet setup? Follow our step-by-step guide, then download XP-FlightDeck.